How Easy is It to Upgrade Storage on a Mac
Most Mac users don’t think about how easy it is to upgrade storage on their computer until they run out of space. Then, they realize that it’s not as simple as just buying a new hard drive and plugging it in. In fact, upgrading storage on a Mac can be fairly complicated and time-consuming.
Here’s a look at what you need to do in order to upgrade your Mac’s storage.
Your Mac comes with a certain amount of storage, and for most people, that’s plenty. But as you use your Mac more and more, you might find yourself running out of space. If that happens, you can upgrade the storage on your Mac pretty easily.
Here’s how to do it:
First, back up your Mac. You don’t want to lose any important data during the upgrade process.
Next, open up the Apple Menu and go to About This Mac. Then click on the Storage tab. Here you’ll see how much storage you currently have and how much is being used.
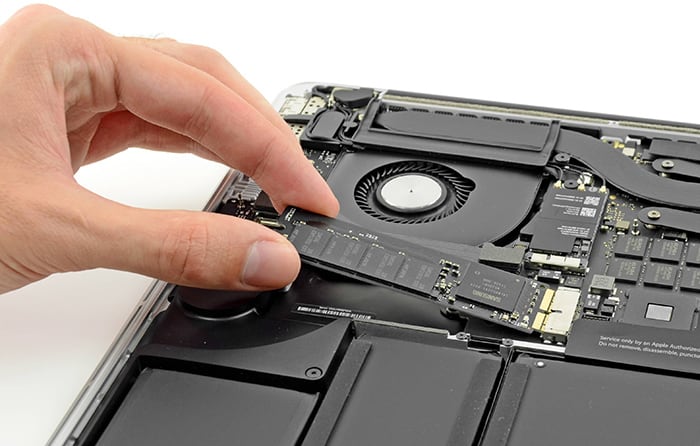
STOP trying to UPGRADE your MacBook… PLEASE!
How to Increase Storage on Macbook Pro
If you’ve been using your Macbook Pro for a while, you may have noticed that the available storage space on your hard drive is gradually decreasing. There are a number of ways to free up some space on your Macbook Pro, but if you’re looking for a more permanent solution, you may want to consider increasing the storage on your machine.
There are a few different ways to increase storage on your Macbook Pro.
One option is to install a second hard drive in your machine. This will give you more total storage space, but it can be a bit tricky and it’s not necessarily the most efficient way to use that extra space (since you’ll likely still end up with some empty space on both drives).
Another option is to replace the existing hard drive with a larger one.
This is probably the easiest way to add more storage to your Macbook Pro, and it’s also likely to be the most cost-effective option since you won’t need to purchase any additional hardware. You can find replacement hard drives for most models of Macbooks online or at your local Apple Store.
Once you’ve decided how you want to increase storage on your Macbook Pro, the next step is actually doing it.
If you’re installing a second hard drive, there are plenty of tutorials online that can walk you through the process (just do a quick search for “install second hard drive macbook pro”). Replacing the existing hard drive is usually just as easy – again, there are plenty of guides available online that can help walk you through the process if needed.
Once everything is up and running, take some time to rearrange files and folders so that important items are stored on the new drive while less essential ones remain on the old one (assuming you’re using two drives).
This will help keep things organized and make sure that important files aren’t taking up valuable space on an older/slower drive. And that’s all there is to increasing storage on your Macbook Pro!
Credit: 9to5mac.com
Can I Upgrade My Mac Storage?
Yes, you can upgrade your Mac storage. If your Mac has an SSD, you can upgrade to a larger capacity SSD. If your Mac has a hard drive, you can replace it with a larger hard drive or upgrade to an SSD.
How Do I Add More Storage to My Mac?
One of the great things about owning a Mac is that they come with plenty of storage space. However, as you start to use your computer more and more, that space can quickly fill up. If you find yourself running out of storage on your Mac, there are a few different ways that you can add more.
One way to add extra storage to your Mac is by using an external hard drive. You can connect an external hard drive to your computer via USB and then drag and drop files onto it just like you would with any other type of storage device. External hard drives are relatively inexpensive and they offer a quick and easy way to increase the amount of storage space on your Mac.
Another option for increasing the storage on your Mac is by using cloud-based services such as iCloud or Dropbox. These services allow you to store files online so that you can access them from anywhere. They’re perfect for storing photos, videos, and documents that you need to be able to access from multiple devices.
And best of all, most of them offer free plans with limited amounts of storage so you can try them out before deciding if you want to upgrade to a paid plan.
If you’re looking for a more permanent solution for adding extra storage to your Mac, then consider upgrading the internal hard drive. This will require opening up your computer and replacing the existing hard drive with a larger one but it’s not as difficult as it sounds.
There are plenty of instructional videos and tutorials online that will walk you through the process step-by-step so even if you’re not particularly tech-savvy, you should be able to do it without too much trouble. Once you have a new hard drive installed, simply reinstall macOS and all of your files will be transferred over automatically.
No matter which method you choose for adding extra storage to your Mac, there are plenty of options available depending on your needs and budget.
So if you find yourself running out of space, don’t panic! With a little bit of effort (and maybe some money),you can easily expand the amount of storage on your beloved Macbook or iMac..
Can You Upgrade Mac Storage After Purchase?
If you’re like most people, you probably don’t think too much about the storage on your computer until you run out of space. Then, it’s a mad scramble to delete old files and make room for new ones. If you’ve ever wished you could just add more storage to your Mac, well, you’re in luck!
It’s actually possible to upgrade the storage on your Mac after purchase, and it’s not even that difficult to do.
The first thing you’ll need to do is purchase a hard drive or solid state drive (SSD) that is compatible with your Mac. Make sure to get one with enough capacity to meet your needs; if you’re not sure how much storage you need, take a look at our guide on finding the right size hard drive for your needs.
Once you have your new hard drive or SSD, there are two ways to install it: inside your Mac or externally via USB.
Installing an internal hard drive or SSD is definitely the way to go if possible; it’s faster and more convenient than using an external drive. But if opening up your Mac isn’t something you’re comfortable doing (or if it’s not possible because of the model of Mac you have), then connecting an external drive is perfectly fine.
Either way, once everything is connected and powered up, all that’s left to do is format the new drive so that macOS can use it. This process can be done through Disk Utility; just open Disk Utility from Applications > Utilities and follow the prompts.
Once everything is formatted and ready to go, simply drag-and-drop any files from your current storage onto the new one; this includes things like documents, music, photos, etc.
You can also set macOS to store new files automatically on the new drive by going into System Preferences > Startup Disk and selecting it as the default boot volume. And that’s really all there is too it! With some simple upgrades, you can greatly increase the amount of available storage on your Mac without having to delete any of your existing files.
Conclusion
It’s pretty easy to upgrade storage on a Mac. You just need to purchase a new hard drive or solid state drive and then install it in your computer. Once you’ve done that, you can use the Migration Assistant tool to transfer all of your files and settings from your old drive to your new one.