How to See Mac Storage
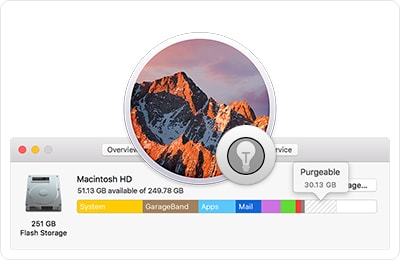
If you’ve ever wondered how much storage space you have left on your Mac, or what is taking up so much space, there’s an easy way to find out. Just click on the Apple icon in the top left corner of your screen and select “About This Mac.” A window will pop up with information about your Mac, including the model name and serial number, as well as how much storage space you have.
You can also click on the “Storage” tab to see a breakdown of what is taking up space on your Mac. For example, you’ll see how much space is being used by apps, photos, music, movies, backups, and more. If you want to free up some space on your Mac, you can start by deleting any unnecessary files that are taking up space.
- Open Finder and click on the hard drive icon
- Find the “Storage” section and check the numbers next to “Used” and “Available
- For a more detailed breakdown, click “Manage
- In the new window that opens, select “Show in Finder” for any of the listed items to see what is taking up space on your Mac’s storage
✅ How To Check Your Storage On MacBook 🔴
What is Other on Mac Storage
If you’ve ever wondered what the “Other” category is in your Mac’s storage, you’re not alone. This catch-all category can include a variety of different types of data, and it can be tough to figure out what exactly is taking up space.
In general, the “Other” category includes any type of data that doesn’t fall into one of the other categories like Applications, Documents, or Photos.
This can include things like system files, caches, plug-ins, and more.
If you want to get a better idea of what’s taking up space in your “Other” category, there are a few ways to do it. First, you can use the Finder to show you which items are taking up the most space.
To do this:
1. Open the Finder and click on Macintosh HD in the sidebar (or whatever your main hard drive is called).
2. Click on View > Show View Options.
3. Make sure that the option for “Calculate all sizes” is selected.4 Now when you look at your files and folders, they will show you how much space they’re taking up next to their names.”
Alternately, if you want a more detailed breakdown of what’s using up space in your “Other” category, you can use a third-party tool like OmniDiskSweeper or DaisyDisk .
These apps will give you a more granular look at what exactly is taking up space on your hard drive so you can make decisions about what to delete accordingly.
Credit: www.intego.com
How Do I See How Much Storage is Left on My Mac
If you want to check how much storage is left on your Mac, there are a few ways to do it.
First, you can click on the Apple icon in the top left corner of your screen and then select “About This Mac.” A window will pop up with information about your Mac, including the amount of storage that is available.
Alternatively, you can open Finder and then click on “Applications” in the sidebar. From there, scroll down to the “Utilities” folder and open the “Activity Monitor” application. Once Activity Monitor is open, select the “Disk Usage” tab at the top.
This will show you how much space is being used on your hard drive and what percentage of your total storage is being used.
Finally, you can also use Spotlight to check your available storage. To do this, simply press Command + Spacebar to open Spotlight and then type in “storage.”
This should bring up an icon for your Storage Management application. Clicking on this will show you information about what is taking up space on your Mac’s hard drive.
Then, Click the Storage Tab
If you’re using iCloud, you can manage your storage and see how much space you have available from your iOS device. Go to Settings > [your name] > iCloud > Manage Storage or iCloud Storage. If you’re using iOS 10.3 or later, tap Settings > [your name].
If you’re signed in with your Apple ID, tap it.
From the list under STORAGE, tap Manage Storage. If you don’t see this option, tap This is My [device], then scroll to the bottom and tap Manage Storage under Advanced.
You might need to enter your passcode or sign in with Touch ID or Face ID when prompted. Here’s what each section of the screen means:
iCloud Drive: shows how much space you have available for files that you store in iCloud Drive
Photos: displays how much storage space is being used by photos and videos Backups: indicates the size of your device backups Other: provides information about Mail, Health data, Podcasts app downloads, Home app data (if any), iTunes U (if any), Voice Memos (if any), App Analytics (if any), and more
You can delete items in some sections by tapping Edit at the top of the screen and then tapping Delete All or Delete Selected below each section. In other sections—like Apps—you might need to go to another screen to delete individual items.
A Bar Chart Will Show You What Kind of Data is Taking Up Space on Your Hard Drive
A bar chart is a graphical representation of data. It uses bars to represent different categories of data. Bar charts are often used to visualize how much space different types of data occupy on a hard drive.
For example, let’s say you have a 100 GB hard drive. 50 GB of that is occupied by video files, 30 GB is occupied by audio files, and 20 GB is occupied by image files. You could use a bar chart to visualize this data.
The video category would be represented by a bar that is 50% the width of the hard drive (50 GB out of 100 GB), the audio category would be represented by a bar that is 30% the width of the hard drive (30 GB out of 100 GB), and the image category would be represented by a bar that is 20% the width of the hard drive (20 GB out of 100GB).
Bar charts can be helpful for quickly understanding how much space different types of data take up on your hard drive. They can also be helpful for identifying which types of data are taking up the most space so you can decide whether or not you need to delete some files or move them to an external storage device.
Where Can I Find My Files Stored on a Mac
If you’re looking for where your files are stored on a Mac, there are a few places you can look. The most likely place is the “Documents” folder, which can be found in the “Finder.” If you’re not sure where that is, you can also find it by going to the “Go” menu at the top of your screen and selecting “Documents.”
Another place to look for files is in the “Downloads” folder. This is where any files that you download from the internet will be saved. To access this folder, go to the “Go” menu and select “Downloads.”
If you still can’t find your file, try doing a search using Spotlight. To do this, click on the magnifying glass icon in the upper-right corner of your screen and type in what you’re looking for. This should help you locate any file on your computer, no matter where it’s been saved.
To Access This Folder, Open a New Finder Window And Then Click on Macintosh Hd in the Sidebar
If you’re looking for a specific file or folder on your Mac, one of the first places you’ll want to check is the Macintosh HD directory. This is the root level of your hard drive, and contains all of your Mac’s default folders (like Applications, Library, System, and Users). You can access this directory by opening a new Finder window and then clicking on Macintosh HD in the sidebar.
Once you’re inside the Macintosh HD folder, you can browse through its contents just like any other folder on your Mac. If you know the name of the file or folder you’re looking for, you can use the search bar at the top of the Finder window to find it more quickly. Otherwise, just take some time to poke around and see what’s inside each directory.
One thing to keep in mind is that many of the items inside Macintosh HD are system files that shouldn’t be modified or deleted. Unless you know what you’re doing, it’s best to leave these alone. But even if you don’t intend to make any changes, it’s still helpful to familiarize yourself with this important directory so that you know where to look when you need to find something on your Mac.
You Should See the Users Folder Listed Here
If you’re using a Windows computer, the Users folder should be listed under This PC. This is where your personal files and folders are stored, including the Desktop, Documents, Downloads, and Pictures folders. If you have multiple user accounts on your computer, each account will have its own Users folder.
The Users folder also contains a Public folder. This is a shared folder that can be accessed by all users on your computer. Anything you put in the Public folder can be seen and used by anyone else who has an account on your computer.
What Types of Files Take Up the Most Storage on a Mac
There are many types of files that can take up a lot of storage on a Mac, but some of the most common are photos, videos, and music files. Photos and videos can be particularly large if they’re high quality, and music files can also be quite large if they’re in lossless format. Other file types that can take up a lot of space include applications, virtual machines, and disk images.
If you’re wondering which type of files are taking up the most space on your Mac, there’s an easy way to find out. Just open the Finder and go to the “All My Files” view. From there, you can sort by file size to see which types of files are taking up the most space.
If you find that you have a lot of large files that you don’t need or use anymore, you can delete them to free up some space.
For Example, If You Have a Lot of Video Or Audio Files, They Will Take Up More Space Than Text Documents Or Images
When it comes to the file size of a document, the type of file you are working with will play a big role. For example, if you have a lot of video or audio files, they will take up more space than text documents or images. This is because videos and audio files are typically much larger in terms of size than other types of files.
As such, you will need to be aware of this when you are dealing with large numbers of these types of files. Additionally, it is important to compress your video and audio files whenever possible to save on space.
Conclusion
If you’re a Mac user, you might be wondering how to check your storage levels. It’s actually pretty easy! Here’s a quick guide on how to do it:
1. Click on the Apple icon in the top left corner of your screen.
2. Select “About This Mac.”
3. A window will pop up with some basic information about your Mac, including its model name and operating system version.
Scroll down to the “Storage” section. Here, you’ll see how much storage space is being used on your Mac, as well as how much is available.
4. If you want more detailed information about what’s taking up space on your hard drive, click the “Manage” button in the Storage section.
This will open up a new window that shows you a breakdown of what’s using up space on your Mac.