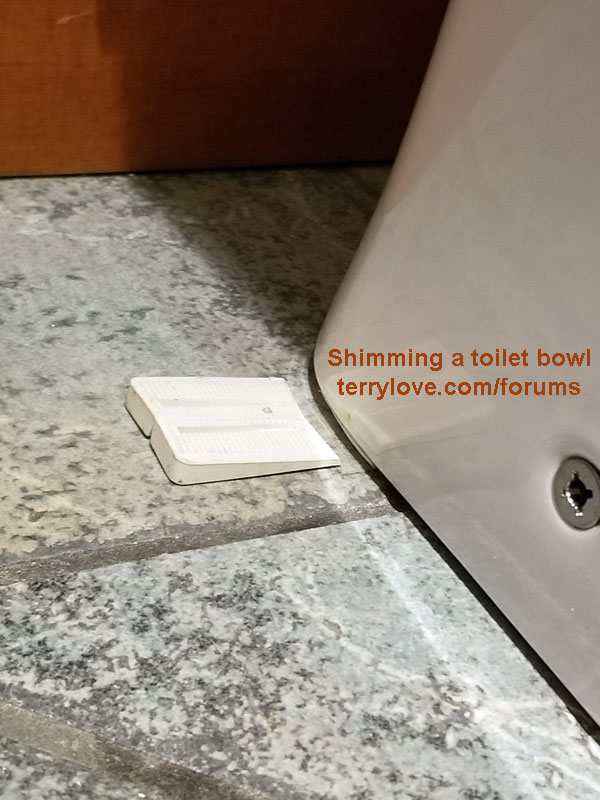
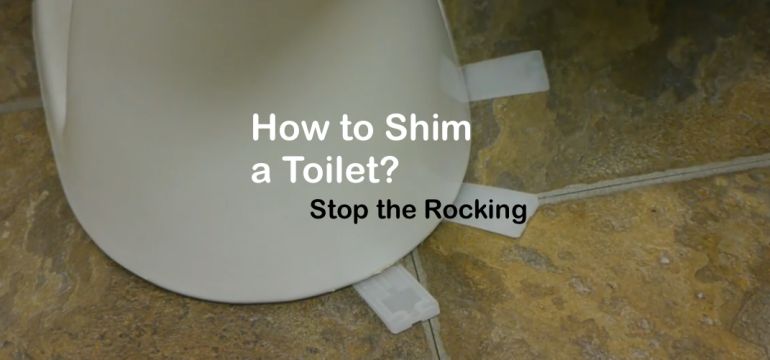
How to Shim a Toilet
If your toilet is wobbly or you notice a gap between the bowl and the floor, it may be time to shim the toilet. Shimming is a simple process that anyone can do with a few tools and materials from the hardware store. Here’s how to shim a toilet:
First, turn off the water to the toilet. Then, flush the toilet to empty the tank and bowl. Next, remove the bolts that hold the toilet to the floor.
Carefully lift the toilet and place it upside down on a towel or tarp. Now you will need to assess which areas need shims. To do this, place a level on top of the bowl in various spots.
Wherever you see that the level is not sitting flat, that’s where you’ll need to place your shims.
Once you’ve determined where to put your shims, cut them to size with a utility knife. then slip them into place under the bowl.
Finally, replace the bolts and washers and tighten them until snug. Turn on the water supply and give your newly shimmed toilet a test flush!
- Check the flange to see if it is level
- If it is not, you will need to shim the toilet
- Place a shim under the toilet at the highest point
- Repeat step 2 until the flange is level
- Once the flange is level, screw in the bolts to secure the toilet in place
Credit: www.h2ouse.org
Can You Shim a Toilet on an Uneven Floor?
If your toilet is rocking or wobbling, it’s likely because the floor beneath it is uneven. You can shim a toilet to level it out and stop the rocking. To do this, you’ll need to measure the amount of space between the floor and the bottom of the toilet bowl.
Then, cut shims to fit that space and slip them under the toilet base until the toilet is level. It’s important to use shims that are made from a waterproof material, like rubber or plastic, so they don’t rot over time.
How Do I Hide the Shims under My Toilet?
If your toilet is rocking or wobbling, it’s likely because the floor beneath it isn’t level. To fix this, you’ll need to install shims under the toilet base until it’s level. But once the shims are in place, you may be wondering how to hide them so they’re not visible.
Here are a few options for hiding shims under a toilet:
– Use caulk: Apply a bead of caulk around the base of the toilet, being careful to fill in any gaps between the shims and the floor. Once the caulk is dry, it will create a seamless look and hide the shims completely.
– Use tile: If your bathroom has tile flooring, you can use matching tile to cover up the shims. Simply adhere tiles over top of the shims using mortar or another type of adhesive. Once dry, grout as usual and no one will ever know there were shims there in the first place!
– Use trim: Another option is to install trim around the base of the toilet. This can be done with wood or PVC trim pieces which can be found at most home improvement stores. Attach the trim using nails or screws, then paint or stain as desired.
The trim will cover up any noticeable gaps and make your toilet look more polished overall.
Can You Shim a Toilet Tank?
If your toilet tank is loose and wobbling, you may be able to shim it to make it more stable. To do this, you’ll need to remove the tank from the bowl so that you can access the bolts that hold it in place. Once the bolts are removed, you can slide a shim under the tank and then replace the bolts to secure it in place.
This may help to stabilize your toilet tank and prevent it from moving around too much.
How Do You Level a Wobbly Toilet?
If your toilet is wobbly, it’s probably because the bolts that attach the toilet to the floor have become loose. To fix this, you’ll need to remove the toilet and tighten the bolts.
Here’s how to do it:
1. Turn off the water supply to your toilet. This is usually done by turning a knob or lever behind the toilet.
2. Flush the toilet to empty out the tank.
3. Use a sponge or rag to soak up any remaining water in the bowl.
4. Unscrew the nuts that hold down the bolts attaching the toilet to the floor. You may need a wrench or pliers for this step.
5. Lift up on the toilet and reposition it so that the bolts are aligned with their holes in the floor again. Tighten down these nuts until they’re snug, but don’t over-tighten them or you could strip them (which would mean you’d have to replace them). Also, make sure that all of your other toilets are level before you put this one back – an uneven bathroom looks pretty silly!
😉 6 Put some wax rings around each bolt and then lower your toilet back into place on top of them (make sure it’s lined up straight!).
How to fix a wobbly toilet bowl / Shim It
How to Shim a Toilet Flange
If your toilet is wobbling or rocking, it may be because the flange that attaches the toilet to the floor is not level. This can be easily fixed by shimming the flange. Here’s how:
1. Turn off the water supply to the toilet and flush the tank to empty it.
2. Disconnect the water supply line from the shut-off valve and remove any bolts that secure the toilet to the floor.
3. Lift up on the toilet and remove it from its location so you can access the flange.
4. Inspect the flange for damage and replace it if necessary. Otherwise, clean any debris from around it so that it’s clear for shimming.
5. Place a shim under one side of the flange until it’s level with respect to The surrounding flooring then secure The flange in place with screws driven through The shim material into The subflooring beneath.
. Shim additional sides of The flange as needed until It Is level In all directions And securely fastened down..
Finally, reconnect The water supply line And turn on The water To test your work..
Shimming a Toilet on Tile
Assuming you would like a blog post discussing how to shim a toilet:
If your toilet is wobbling or rocking, it may be due to an uneven floor. You can fix this by shimming the toilet.
Shimming is simply adding spacers between the toilet and the floor to level it out. This is a relatively easy do-it-yourself project that anyone can do with a few tools and materials.
Tools and Materials Needed:
-Tape measure
-Level
-Shims (wooden or metal)
-Cordless drill
-1/8” drill bit
-Construction adhesive
Instructions: 1) Measure the distance from the back of the toilet flange to the wall. 2) Use a level to see if the floor is level at this measurement.
If it’s not, measure how much higher or lower different parts of the floor are in relation to one another until you find the highest point. 3) Place a shim at this highest point, then use your cordless drill fitted with an 1/8” drill bit to make pilot holes through both the shim and into the floor. 4) Apply construction adhesive to both sides of each shim and insert them into place.
5) Check that your toilet is now level front to back and side to side, then give the adhesive 24 hours to cure before using your bathroom as usual!
How Much Can You Shim a Toilet
If your toilet is rocking or wobbling, it may be due to a uneven floor. You can fix this problem by shimming the toilet. Shimming is when you add a thin piece of material, such as wood, metal or plastic, to level out an object.
In this case, you would use shims to level out your toilet so it doesn’t rock or wobble.
The amount that you can shim a toilet depends on the size of the shims and how many shims you use. It’s best to start with smaller shims and use more if needed.
You don’t want to use too many shims because then your toilet won’t be stable and could tip over. If you’re not sure how many or what size shims to use, ask a hardware store employee for help.
Best Toilet Shims
If you’re in the market for a new toilet, you may be wondering what the best toilet shims are. Toilet shims are designed to level your toilet and prevent it from rocking. They’re usually made of plastic or rubber and come in a variety of thicknesses.
The thickness of the shim you’ll need will depend on how much your toilet is off-level. If your toilet is only slightly off-level, you’ll likely only need a thin shim. But if it’s significantly off-level, you may need a thicker shim.
When choosing a shim, make sure to pick one that’s durable and easy to install. You should also make sure it’s not too thick, as this could make it difficult to close the lid on your toilet seat.
Once you’ve chosen the right shim for your needs, simply place it under the appropriate side of the toilet until it’s level.
Then, use a screwdriver or drill to secure the shim in place (if necessary). That’s all there is to it!
Toilet Shim Plate
If your home is anything like ours, then you know that the toilet is one of the most important fixtures in the house. Not only is it used daily, but it also plays a crucial role in the overall look and feel of your bathroom. That’s why when our toilet started leaking, we knew we had to act fast and find a solution.
After doing some research, we landed on a toilet shim plate. A what? We know, we were just as confused at first.
But after reading up on this helpful little product, we realized it was exactly what we needed to fix our leaky loo.
So, what exactly is a toilet shim plate? It’s a small metal or plastic plate that fits over the bolts that secure your toilet to the floor.
Once installed, it creates a tight seal that prevents leaks (like the one we were dealing with). It’s an easy fix that anyone can do- no plumbing experience necessary!
If you’re dealing with a leaky toilet, then we highly recommend giving a shim plate a try.
It’s an inexpensive and easy way to solve the problem without having to call in a professional (and pay big bucks!).
Diy Toilet Shims
Toilet shims are an essential part of any do-it-yourself toilet installation. They help level the toilet so that it sits flush with the floor, and they also provide support to prevent the toilet from rocking. Toilet shims come in a variety of thicknesses and widths to accommodate different toilets and floors.
Most importantly, toilet shims should be made of a durable material that will not compress over time. Foam or rubber shims are not recommended as they will lose their shape and become ineffective over time. Wood or metal shims are the best choices for longevity and stability.
When installing a toilet, always use at least two shims per side to ensure stability. Place one shim at the front of the bowl and one at the back. For extra support, you can also place a third shim in the middle of the bowl.
Use a level to check that the toilet is sitting level before proceeding with installation.
If your floor is uneven, you may need to use more than two shims per side or even stack multiple shims on top of each other to get the desired effect. It’s important to take your time when leveling the toilet so that it sits correctly and doesn’t rock when you sit on it!
How to Cut Toilet Shims
If your toilet is wobbly, it’s likely due to uneven flooring. To fix this, you’ll need to cut some shims to fit under the toilet base. Here’s how:
1. Start by measuring the width and length of the space under your toilet. Then, using a utility knife, score a line around the perimeter of each shim. This will make it easier to snap the shims cleanly in half.
2. Next, place the shims on a cutting board and use a sharp knife to carefully cut them in half along the scored lines.
3. Once all of your shims are cut, it’s time to install them beneath your toilet base. To do this, simply slip the shims underneath the base until they’re snug against the flooring.
Make sure that each shim is level before moving on to the next one.
4. Once all of the shims are in place, go back and check that your toilet is still level and wobble-free! If so, then you’re all done – congrats!
Plastic Toilet Shims
If you’re in the process of installing a new toilet, you may be wondering what kind of shims to use. There are many different types of shims on the market, but one type that is gaining popularity is plastic toilet shims.
Plastic toilet shims are great for a few reasons.
First, they’re very easy to install. Simply slip the shim under the toilet flange and tighten the bolts. Second, they’re very strong and durable.
They won’t compress like foam or cardboard shims, so your toilet will be level and stable for years to come.
Another advantage of plastic toilet shims is that they’re waterproof. This means that if your floor is ever leaking, the shim won’t absorb water and swell up like other types of shims can.
Finally, they’re inexpensive and widely available at most hardware stores.
If you’re looking for an easy-to-install, durable, waterproof way to level your toilet, then plastic toilet shims are a great option!
Conclusion
If your toilet is rocking or wobbling, it may be due to an uneven floor. You can fix this by shimming the toilet. This is a relatively easy process that anyone can do.
First, turn off the water to the toilet. Then, flush the toilet to empty the tank. Next, remove the bolts that hold the toilet to the floor and lift it up.Now you will need to measure the distance between the floor and where the bolts were holding the toilet in place.
This will help you determine how much shim material you will need.
There are a few different materials you can use for shims, such as wood or plastic. Once you have your material, cut it into strips that are slightly longer than the measurement you took earlier.
Now put these strips under the bolt holes and replace the bolts. Make sure to hand-tighten them so they’re snug but not too tight.
Turn on the water and test out your new shimmed toilet!