What Size Trowel for 12X12 Wall Tile
When it comes to trowels, size definitely matters. The size of the Notch on your trowel will determine the amount of thinset you can apply to the back of your tile. Too much thinset will make it difficult to smooth out your tile and could cause lippage (where one edge of your tile sticks up higher than another).
Too little thinset will mean that your tiles aren’t well adhered to the wall and could eventually fall off. So what’s the right size trowel for 12×12 wall tile?
When tiling a wall, the size of your trowel will depend on the size of your tiles. For 12×12 wall tiles, you’ll need a 1/2″ x 1/2″ square notch trowel. This size trowel will give you enough mortar coverage for proper bonding, without using too much mortar.
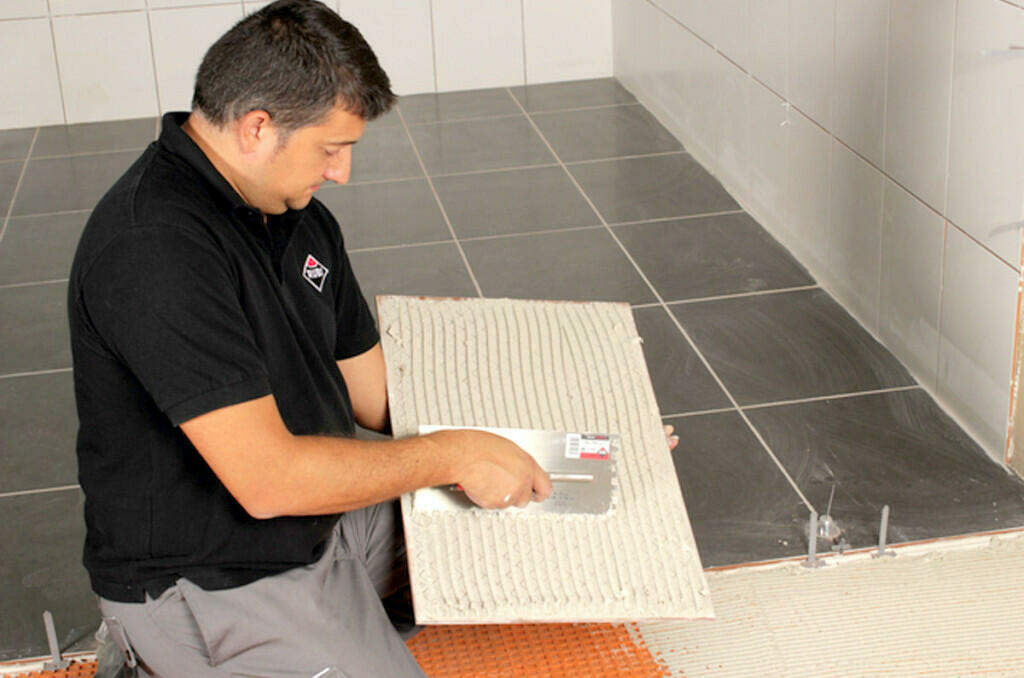
Credit: www.rubi.com
What Size Trowel Should I Use for Wall Tile?
When it comes to trowels, size does matter. The width of the notch on your trowel should match the thickness of your tile. For example, if you’re using 3/8-inch-thick tiles, you need a 3/8-inch square-notch trowel.
If you have 1/2-inch tiles, use a 1/2-inch square-notch trowel, and so on.
The length of the blade is also important. A short blade (4 to 6 inches) is good for small jobs, such as installing border tile or touching up an area around a drain or outlet.
A long blade (8 to 10 inches) gives you more coverage with each pass and is ideal for large projects like covering an entire shower wall or tub surround.
How Thick is Thinset for 12X12 Tile?
When it comes to thinset, there is no one-size-fits-all answer. The thickness of the thinset will depend on the tile you are using, as well as the substrate or surface that you are tiling.
For example, if you are using 12×12 ceramic tiles on a concrete floor, you will need a different thickness of thinset than if you were using the same tiles on drywall.
Generally speaking, the thicker the tile, the thicker the thinset should be. For 12×12 tiles, a good rule of thumb is to use a 1/4″ thick layer of thinset. This will ensure that your tiles have enough support and bonding strength.
How Do You Install 12X12 Ceramic Tile on a Wall?
Assuming you would like a step by step process on installing 12×12 ceramic tiles on a wall:
1. Clear the area where the tiles will be installed. Make sure the surface is clean, dry and free of any debris or contaminants.
If necessary, use a mild detergent or cleaner to remove any dirt or grime. Allow the surface to completely dry before proceeding.
2. It is important to create a level surface before installing the tiles.
Use a leveler or laser leveler to check if the surface is even. If not, make adjustments as necessary. You can use shims under certain areas to level out unevenness.
Once the surface is levelled, mark out reference lines using a chalk line or ruler so that you have guidelines for tile installation later on.
3. Decide on your tile pattern and layout beforehand so that you know how many tiles you need and where each tile should go. This will save you time and effort during installation later on.
4a) For adhesive installation: Apply an even layer of adhesive onto the wall using either a trowel or putty knife, following manufacturer’s instructions (typically 1/16” – 3/16” thickness). Start from the bottom corner of your project area and work your way up in small sections (about 3 square feet at a time). Immediately begin setting your tile into place while the adhesive is still wet; gently pressing each one into place as you go along.
* Keep in mind that most adhesives require at least 24 hours to fully cure, so avoid walking or placing too much weight on newly installed tiles during this time period.* 4b) For mortar installation: Mix together your mortar according to manufacturer’s instructions; it should have a peanut butter-like consistency when properly mixed together (not too runny nor too thick). Using either a hawk & trowel OR mud pan & float method, apply an even layer of mortar onto small sections of wall (again, about 3 square feet at a time), working from bottom to top until all desired areas are covered.
* Gently set each tile into place while mortar is still wet; use spacers if needed in order keep consistent joints between each tile.* 5c) For thinset installation: Prepare thinset according to manufacturer’s instructions (usually just mixing with water until it has an oatmeal-like consistency).
What Size Spacers Should I Use for 12X12 Tiles?
When it comes to tile size, the bigger the better. But when you’re working with 12×12 tiles, you need to use spacers that are at least 1/4 inch thick. This will ensure that your tiles are evenly spaced and level.
Tile Notch Trowel sizes. Which trowel size do you need for ….? [Full vid]
What Size Notch Trowel for 12X24 Wall Tile
When it comes to tile installation, the size of your notch trowel is important. The general rule of thumb is that the size of your notch trowel should be equal to or one size larger than the side length of your tile. So, for a 12×24 wall tile, you would use a 13″ or 14″ notch trowel.
Notch trowels come in many different sizes, so it’s important to choose the right one for your project. A bigger notch trowel will create more space for mortar between the tiles, which can lead to a weaker bond and eventual tile failure. Conversely, a smaller notch trowel won’t provide enough space for adequate mortar coverage, which can also lead to tile failure.
To ensure proper coverage and bonding of your 12×24 wall tiles, we recommend using either a 13″ x 3/8″ U-notch or V-notch trowel (for thin-set mortar) or an 11/16″ square-notch trowel (for mastic adhesive). For best results, always follow the manufacturer’s recommendations for both the product being used and the size of notched trowel required.
Conclusion
When it comes to trowels, size definitely matters. The general rule of thumb is that the larger the tile, the larger the notched trowel you should use. For 12×12 wall tiles, a 1/2″ x 1/2″ square-notched trowel is typically used.
This size will allow for proper coverage of thinset mortar, which is important for making sure your tile adheres properly to the wall.