Where Do Airdrop Photos Go on Mac
When you take an airdrop photo on your Mac, it automatically saves to your Pictures folder. But what if you want to change where it goes? You can actually choose any folder you want!
When you take a photo with your iPhone, it’s automatically saved to your camera roll. But what if you want to share it with someone else? That’s where Airdrop comes in!
Airdrop is a feature that lets you wirelessly share photos and other files with other Apple devices.
To use Airdrop, both devices need to be running iOS 7 or later and have Wi-Fi turned on. Once that’s all set up, just open the Photos app and select the photo or video you want to share.
Then tap the Share button and choose the device you want to share with from the list. The recipient will get a notification asking if they want to accept the transfer, and once they do, the file will be downloaded onto their device.
So next time you want to quickly share a photo with someone nearby, give Airdrop a try!
How to Airdrop from iPhone to Mac | How to AirDrop a file from your iPhone to Mac
Can’T Find Airdrop Photos on Mac
If you’re using a Mac and you can’t find your Airdrop photos, don’t worry – they’re probably just hidden. Here’s how to access them:
1. Open Finder and click on the “Go” menu at the top of the screen.
2. Select “Go to Folder” from the drop-down menu.
3. Type in ~/.airdrop into the box that appears and hit enter.
4. Your Airdrop photos should now be visible in this folder.

Credit: www.cleverfiles.com
How Do I Enable Airdrop on My Mac
Assuming you would like instructions on how to enable Airdrop on a Mac:
Airdrop is a feature that allows you to share files wirelessly between Apple devices. It uses Bluetooth to create a connection and then Wi-Fi to transfer the data.
You can use Airdrop with any Mac running macOS Lion or later and any iPhone, iPad, or iPod touch running iOS 7 or later.
Here are the steps to enable Airdrop on your Mac:
1) Open Finder from your Dock
2) Click on AirDrop in the sidebar (if you don’t see it, click on Go > AirDrop)
3) Choose who can send files to your computer: Everyone, Contacts Only, or Receiving Off
If you choose Contacts Only, make sure that the email address or phone number associated with your Apple ID is selected in the “Allow me to be discovered by” section at the bottom of the Finder window.
4) Click Done
How Do I Use Airdrop to Transfer Photos from My Iphone to My Mac
Assuming you would like a step-by-step guide on how to use Airdrop to transfer photos from your iPhone to your Mac:
1. Make sure that both your iPhone and Mac are logged into the same iCloud account.
2. On your iPhone, open the Photos app and select the photo or photos you’d like to share.
3. Tap the Share icon in the lower left corner of the screen.
4. Select AirDrop from the sharing menu. If AirDrop is not visible, swipe up from the bottom of your screen to access Control Center and make sure that both Wi-Fi and Bluetooth are turned on.
5. Your Mac will appear as an available device in the AirDrop section – tap it to initiate transfer.
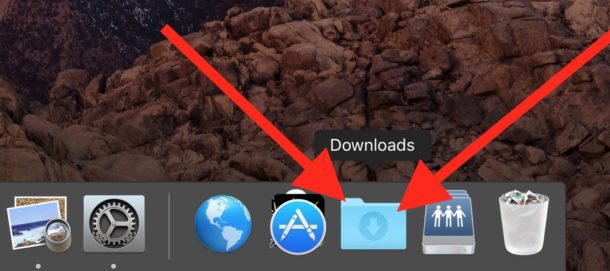
6. Once transfer is complete, you can find the photo or photos in your Downloads folder on your Mac computer.
Where Do the Photos Go When I Use Airdrop to Transfer Them from My Iphone to My Mac
When you use Airdrop to transfer photos from your iPhone to your Mac, the photos are saved in a folder on your Mac. The exact location of this folder depends on which version of macOS you’re using. On macOS Mojave or earlier, the folder is called “Airdrop” and is located in the Finder sidebar.
Conclusion
When you take an airdrop photo on your Mac, it automatically saves to your desktop. You can find the photo by opening up Finder and selecting “Desktop” from the sidebar. The photo will be in the same place as any other photos you’ve saved on your computer.