3 Pin Vs 4 Pin Fan
3 Pin Vs 4 Pin Fan: Which is better?
When it comes to fans, there are two main types: 3 pin and 4 pin. Both have their own advantages and disadvantages, so it can be hard to decide which one is right for you.
Here’s a breakdown of the key differences between 3 pin and 4 pin fans to help you make a decision.
3 Pin vs 4 Pin Fan: Which is better for your needs?
When it comes to fans, there are two different types of connectors that you will see on the market, 3 pin and 4 pin. So, which one should you choose for your needs?
Here is a look at the differences between these two types of fans so that you can make a decision.
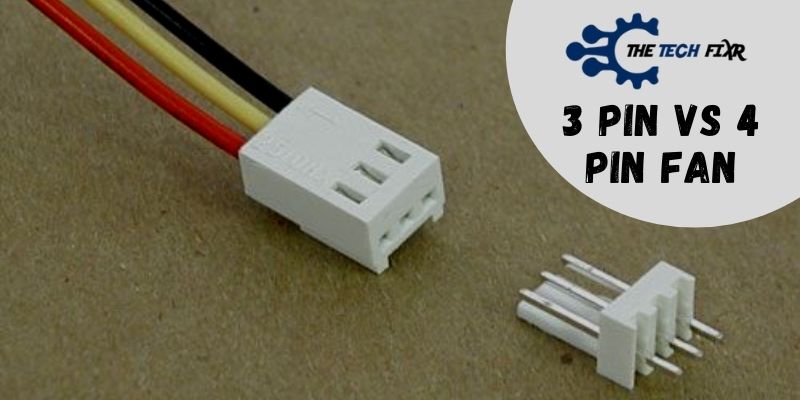
3 Pin Fans
3 pin fans are the most common type of fan on the market.
They usually come with three wires, including power, ground, and control. The power wire provides electricity to spin the blades, while the ground wire helps to keep them from shocking you. The control wire allows you to adjust the speed of the blades.
One advantage of 3 pin fans is that they are very inexpensive. In fact, they are often one of the cheapest options available. Additionally, they tend to be very easy to install since all you need to do is connect three wires.
However, one downside is that they offer less control than 4 pin fans since there is only one speed setting. Additionally, if your computer does not have a built-in fan controller, then you will not be able to change the speed at all without adding an aftermarket controller. Overall though, 3 pin fans offer a good balance between price and performance and work well for most people’s needs.
.
4 Pin Fans
4 pin fans are becoming more popular as people move towards using PWM (Pulse Width Modulation) fan headers on their motherboards instead of traditional voltage controlled headers found on older boards.
PWM allows much finer grain control over how fast or slow a fan spins by changing how often an electric pulse is sent to the motor – think of it like turning up or down an imaginary dial rather than just having an on/off switch like with voltage-controlled headers (or 3-pin connectors). This means that 4-pin PWM header equipped motherboards can take full advantage of today’s advanced CPU coolers which often come with 4-pin sockets (or include adapters), something that wasn’t possible before without voiding any warranties due to modification!
3 Pin Vs 4 Pin Fan| Sort Out the Entire Gist!
Can I Plug a 4 Pin Fan into a 3 Pin?
No, a 4-pin fan cannot be plugged into a 3-pin connector on a motherboard. The fourth pin on a 4-pin fan is for a tachometer, which measures how fast the blades of the fan are spinning. Three-pin connectors do not have this fourth pin.
What are the 4 Pins on a Fan For?
The four pins on a fan are for the power, ground, tachometer, and PWM signals. The power and ground pins provide power to the fan. The tachometer pin is used to sense the speed of the fan blades.
The PWM pin is used to control the speed of the fan.
Are Pwm Fans 3 Or 4 Pin?
PWM (pulse width modulation) is a type of DC (direct current) motor control that uses digital signals to control the speed and torque of a DC motor. PWM fans are available in both 3-pin and 4-pin varieties. The main difference between the two is that 4-pin PWM fans can be controlled via software, while 3-pin PWM fans must be controlled manually.
3-pin PWM fans are typically used in lower-end systems, where manual fan control is sufficient. 4-pin PWM fans are used in higher-end systems where software fan control is desired. Software fan control allows for more precise and granular control over fan speeds, which can result in quieter operation and lower temperatures.
Credit: noctua.at
3 Pin Vs 4 Pin Fan Reddit
There are two types of computer fans: 3-pin and 4-pin. Here’s a look at the difference between them, and which one is right for your PC.
3-pin fans are the most common type of fan used in computers.
They typically have three wires: power, ground, and a third wire that controls the speed of the fan. 3-pin fans can be plugged directly into a motherboard header, or they can be daisy-chained from another fan.
4-pin fans are less common than 3-pin fans, but they offer some advantages over their older counterpart.
Like 3-pin fans, they have four wires: power, ground, and two control wires that dictate fan speed. However, 4-pin fans also support PWM (pulse width modulation), which allows for finer control over fan speeds. Additionally, 4-pin fans can often be found with higher quality bearings and motors than 3-pin fans.
So which type of fan is right for you? If you’re looking for basic cooling with no frills, a 3-pin fan will do the job just fine. However, if you want greater control over your fan speeds (especially at lower speeds), or you want a higher quality fan overall, then a 4-pin model is the way to go.
4-Pin Fan Controller
4-Pin Fan Controller
A 4-pin fan controller is a device that regulates the speed of a 4-pin computer fan. The controller uses Pulse Width Modulation (PWM) to control the speed of the fan.
A 4-pin fan has four wires: two for power and two for control. The controller modulates the power to the fan, which in turn changes the speed of the fan.
The advantage of using a 4-pin controller is that it can control the speed of the fan more precisely than a 3-pin controller.
A 3-pin controller can only ON/OFF or change the voltage supplied to thefan, while a 4-pin controller can actually change how long each pulse of electricity is (known as duty cycle). This means that a 4-pincontroller can make a fan run slower or faster, depending on how you want to configure it.
4-pin controllers are not just for CPU fans; they can also be used on case fans and other types of cooling fans in your computer.
If you have ever boughta CPU cooler that came with its own Fan Speed Controller, chances are it was a 4-PIN PWM Controller.
2 Pin Vs 3 Pin Vs 4 Pin Fan
When it comes to computer fans, there are typically three different types that you will find on the market – 2-pin, 3-pin and 4-pin. So, which one should you choose for your needs?
2-Pin Fans:
2-pin fans are the most basic type of fan available and they simply plug into a motherboard header. They offer very basic control over speed and don’t provide any extra features. However, they are also the cheapest option so if you’re on a budget, they may be worth considering.
3-Pin Fans:
3-pin fans offer slightly more control over speed than 2-pin fans as they come with a dedicated fan controller. This means you can set the exact speed at which you want the fan to run which can be helpful in reducing noise levels.
However, 3-pin fans are also more expensive than 2-pin options.
4-Pin Fans:
4-pin fans offer the same level of control as 3-pin fans but with one additional feature – PWM (pulse width modulation).
This allows for even more granular control over speed and means that 4-pin fan speeds can be automatically controlled by your motherboard based on temperature readings. As such, 4-pin fans tend to be the most expensive option but they do offer the best performance and features.
3 Pin Fan Pinout
3 Pin Fan Pinout
The standard 3-pin fan connector is widely used in computers and many other electronic devices. It is a simple and reliable way to connect a fan to a power source.
The three pins are +12V, ground, and tachometer (speed sensor).
+12V is the power pin. It supplies power to the fan motor.
Ground is the return path for electric current and helps complete the circuit. The tachometer pin produces a pulse signal that indicates how fast the fan is spinning.
Most fans will work with just +12V and ground connected, but some fans may require all three pins connected in order to function properly.
Check your fan’s documentation to be sure.
Here’s a quick overview of how to wire up a 3-pin fan connector:
Connect the red wire from the fan to the +12V power pin on the connector.
Connect one of the black wires from the fan to one of the ground pins on the connector (it doesn’t matter which). If your fan has a speed sensor, connect the yellow wire from thefan tot he tachometer pin onthe connector. That’s it!
Your fan should now be operational.
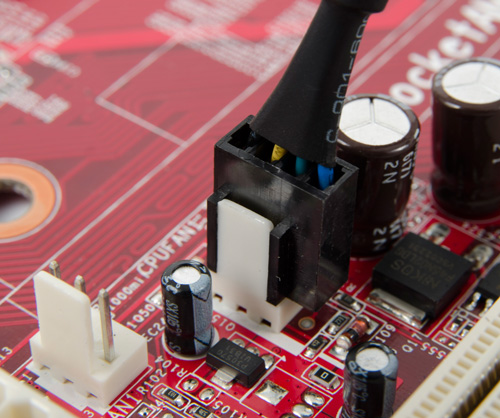
3 Pin Fan Connector
A three-pin fan connector is a small electrical connector that is used to power a computer fan. The three pins on the connector are responsible for supplying power to the fan, and they are typically arranged in a triangle shape. Fan connectors can be found on the motherboard of a computer, or on the back of a CPU cooler.
The most important thing to know about three-pin fan connectors is that they provide 12V of power to the fan. This is enough voltage to spin the fan at high speeds, but it’s not enough to damage sensitive electronic components. That’s why it’s important to make sure that the connector is properly rated for the specific fan that you’re using.
Another thing to keep in mind is that three-pin fan connectors only work with devices that use DC current. If you try to use one with an AC powered device, it won’t work. Additionally, some motherboards have four-pin headers that can be used for either type of device.
However, these headers are not compatible with three-pin fans.
4-Pin Fan Pinout
When it comes to 4-pin fan pinouts, there are a few things that you need to know. First, there are two different types of 4-pin fans: 3-pin and 4-pin. 3-pin fans have three wires: ground, power, and control.
4-pin fans have four wires: ground, power, control, and tachometer. Tachometer is an optional fourth wire that allows the fan to report its speed back to the motherboard.
Now that you know the difference between 3-pin and 4-pin fans, let’s take a look at the pinout for each type of fan.
3 Pin Fan Pinout
The pinout for a 3-pin fan is very simple:
1. Ground (-)
2. Power (+)
4-Pin Fan Splitter
A 4-pin fan splitter is a device that allows you to connect multiple fans to a single 4-pin header on your motherboard. This can be useful if you have more than one fan in your system, or if you want to connect multiple fans to a single header for improved airflow.
There are two main types of 4-pin fan splitters: those with pass-through connectors, and those without.
Pass-through splitters will allow you to daisy chain multiple fans together, while non-pass-through splitters will only allow you to connect two fans directly to the header. In most cases, it’s best to use a pass-through splitter so that you can ensure adequate airflow throughout your system.
When connecting multiple fans to a single header, it’s important to keep in mind that each fan will share the same speed signal.
This means that if one fan is connected directly to the header and another is connected through a splitter, both fans will operate at the same speed. If you want independent control over each fan’s speed, you’ll need to use separate headers for each fan.
4-pin fan splitters are relatively inexpensive and easy to find, so they’re a great way to improve airflow in your system without spending a lot of money.
Just be sure to choose one that fits your needs and gives you the level of control that you want over your system’s cooling.
4-Pin Cpu Fan Connector Function
Your computer’s CPU fan is one of the most important components when it comes to keeping your system cool and running smoothly. The 4-pin cpu fan connector is responsible for supplying power to the fan so that it can spin and circulate air around the CPU. If this connection becomes loose or damaged, it can cause your CPU fan to stop working altogether.
Here’s a closer look at the 4-pin cpu fan connector and what it does:
The 4-pin cpu fan connector is typically located near the top of the motherboard, close to where the CPU is located. It is made up of four pins that are arranged in two rows of two.
The top row contains two pins that are responsible for supplying power to the fan, while the bottom row has two ground pins.
In order for the CPU fan to work properly, all four of these pins must be securely connected. If even one pin becomes loose or damaged, it can cause problems with the operation of the entire cooling system.
That’s why it’s important to check all fourpins regularly to make sure they are still intact and properly connected.
If you do find that one of these pins has become loose or damaged, you’ll need to replace it as soon as possible in order to avoid any further damage to your system. Luckily, replacement parts are widely available and relatively easy to install.
Simply remove the old pin and replace it with a new one – no soldering required!
Conclusion
There are two types of computer fans: 3-pin and 4-pin. Both types of fans are used to cool computers, but they work in different ways. 3-pin fans are connected to the motherboard and spin at a constant speed.
4-pin fans are connected to the power supply and can spin at different speeds, depending on how much cooling is needed.
3-pin fans are cheaper and easier to install than 4-pin fans, but they don’t provide as much cooling. 4-pin fans cost more, but they can cool your computer more effectively.