How Do I Add Page X of Y in Mac
If you’re using a Mac, there are a few different ways to add page numbers to your document. One way is to use the Pages tool, which is built into the Mac operating system. This tool allows you to add page numbers as well as other elements, such as headers and footers.
Another way to add page numbers is to use a word processing program like Microsoft Word or Apple’s Pages app. Both of these programs have options for adding page numbers, so you can choose whichever method you prefer.
If you’re a Mac user, you may be wondering how to add page numbers to your documents. Luckily, it’s a pretty easy process! Here’s a quick step-by-step guide:
1. Open the document that you want to add page numbers to.
2. Click on the ‘Insert’ tab at the top of the screen.
3. In the ‘Insert’ menu, select ‘Page Numbers.’
4. A dialogue box will appear – select where you want the page numbers to appear in your document (typically either at the top or bottom).
5. That’s it! The page numbers will now automatically be inserted into your document as you type.
insert page number in word X of Y
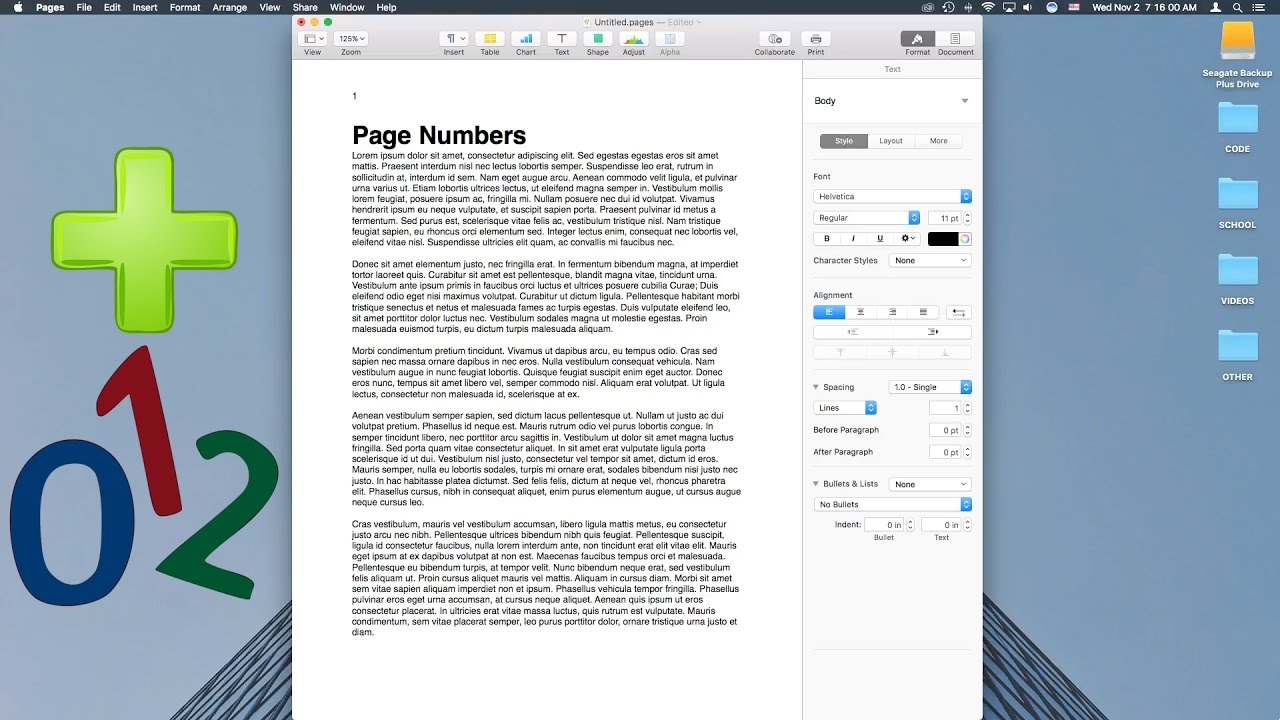
How to Add Page Numbers in Pages on Mac
If you’re using a Mac and Pages to format your documents, you may be wondering how to add page numbers. Luckily, it’s a pretty easy process! Here’s how to do it:
1. Open your document in Pages.
2. Click on the View menu and select Show Layout.
3. In the toolbar that appears at the bottom of the window, click on the Insert button and then choose Page Numbers from the drop-down menu.
4. A dialog box will appear. From here, you can choose where you want the page numbers to appear (on the left, right, or center of the page) as well as what style you’d like them to be in (Arabic numerals, Roman numerals, etc.). Once you’ve made your selections, click OK.
5. That’s it! Your pages will now be numbered accordingly.

Credit: www.businessinsider.nl
How Do You Insert Page X of X in Word for Mac?
If you want to insert “page X of Y” into a Word document (Mac), here’s how:
1. Open your document in Word.
2. Place your cursor where you want the text to appear.
3. Go to Insert > Header & Footer > Page Number > Format Page Numbers…
4. In the “Page number format” drop-down, select “i, ii, iii, …”. This will insert Roman numerals for your page numbers.
5. Click “OK”.
6. Type ” of ” (include the space before and after the word “of”) into your document where you want it to appear between the Roman numeral page number and the total number of pages in your document.
7. Highlight the word “of” that you just typed in Step 6 above.
8 field next to it, type \# MERGEFORMAT . This tells Word to take the current page number from wherever it is in your document and merge it into this spot instead of typing out a specific page number here manually like we did with the word “of” in Step 6 . All together, what you should have typed into this Custom Footer box is \#MERGEFORMAT OF .
Now click “Apply To” and choose “Whole Document” from the drop-down menu that appears if it’s not already selected by default Note: The “#” symbol before MERGEFORMAT tells Word to insert the current page number at this spot in our footer while retaining its original formatting as a Roman numeral 9 . In order for our OF code works correctly , we need one more thing: go back up to Step 3 above but this time select “Plain Number” instead of “Roman Numeral” as your Page Number Format option 10 . After selecting Plain Number , hit OK again and then close out of the Header & Footer Tools by clicking on View > Normal 11 .
That’s it!
How Do You Do Page 1 of 2 in Word on a Mac?
Assuming you are referring to how to make two pages on one document in Microsoft Word for Mac:
1. Open a new or existing document in Microsoft Word.
2. On the Layout tab, in the Page Setup group, click Breaks.
3. Click Next Page. This will insert a break at your cursor location and create a new page.
4a.
If you want the second page to be landscape orientation, while on the second page, go back to the Layout tab > Page Setup group > Orientation and select Landscape.
4b. If you do not want the second page to be landscape orientation, leave it as portrait (the default).
How Do You Insert Page Numbers on a Mac?
If you need to add page numbers to a document on your Mac, there are a few different ways you can do it.
One way is to use the Pages app that comes with macOS. Open the Pages app and create a new document or open an existing one.
Then click on the “View” menu and select “Show Page Numbers”. This will add page numbers to the bottom of each page in your document.
Another way to add page numbers is to use Microsoft Word.
If you have Microsoft Word installed on your Mac, you can open it and create a new document or open an existing one. Then click on the “Insert” menu and select “Page Number”. This will insert page numbers into your document at the current cursor position.
You can also add page numbers using Adobe Acrobat Pro DC. Open Adobe Acrobat Pro DC and open the PDF file that you want to add page numbers to. Click on the “Tools” menu and then select “Pages” followed by “Number Pages…”.
This will bring up a dialog box where you can specify where you want the page number to appear as well as other options such as font size and color.
How Do I Insert Page Numbers in Word for Mac?
Assuming you would like to insert page numbers into a Microsoft Word document on a Mac:
1. Open your document in Microsoft Word.
2. Click on the ‘Insert’ tab at the top of the screen.
3. In the ‘Header & Footer’ section of the ‘Insert’ tab, click on the ‘Page Number’ drop-down menu and select the location where you would like your page number to appear (e.g., top of page, bottom of page, margin).
4. If you would like to format your page number further (e.g., include chapter number), click ‘Format Page Numbers’ in the ‘Page Number’ drop-down menu and make desired changes in the ‘Page Number Formatting’ window that pops up. When finished, click ‘OK’.
Conclusion
Assuming you would like a summary of the blog post titled “How Do I Add Page X of Y in Mac”:
The article provides detailed instructions on how to add page numbers to a document in Mac. The first step is to open the document in Pages.
Then, click on the View tab and select Show Ruler. Next, click on the Insert tab and select Page Numbers. A menu will appear with different options for positioning the page number.
Once you have selected your preferred option, click on the Format tab and select Document. Finally, under Layout, select Pagination and choose your desired settings.