How to Color Melt Hair at Home
If you’re looking for a fun and easy way to change up your hair color, why not try color melting? It’s a technique that can be done at home with some simple supplies. All you need is a box of hair color, a bowl, and a brush.
To get started, mix your desired hair color with equal parts developer in the bowl. Then, apply the mixture to your dry hair starting from the roots. Work in small sections and use the brush to evenly distribute the color.
Once all of your hair is coated, let it sit for 20-30 minutes before rinsing out with shampoo and conditioner.
- Start with clean, dry, and styled hair
- If your hair is already colored, you’ll want to make sure it’s in good condition before starting the color melt process
- Choose your colors
- To create a natural-looking color melt, you’ll want to choose two colors that are similar to each other but have different depths of tone
- For example, if you have dark brown hair, you could use a light brown and a dark blonde
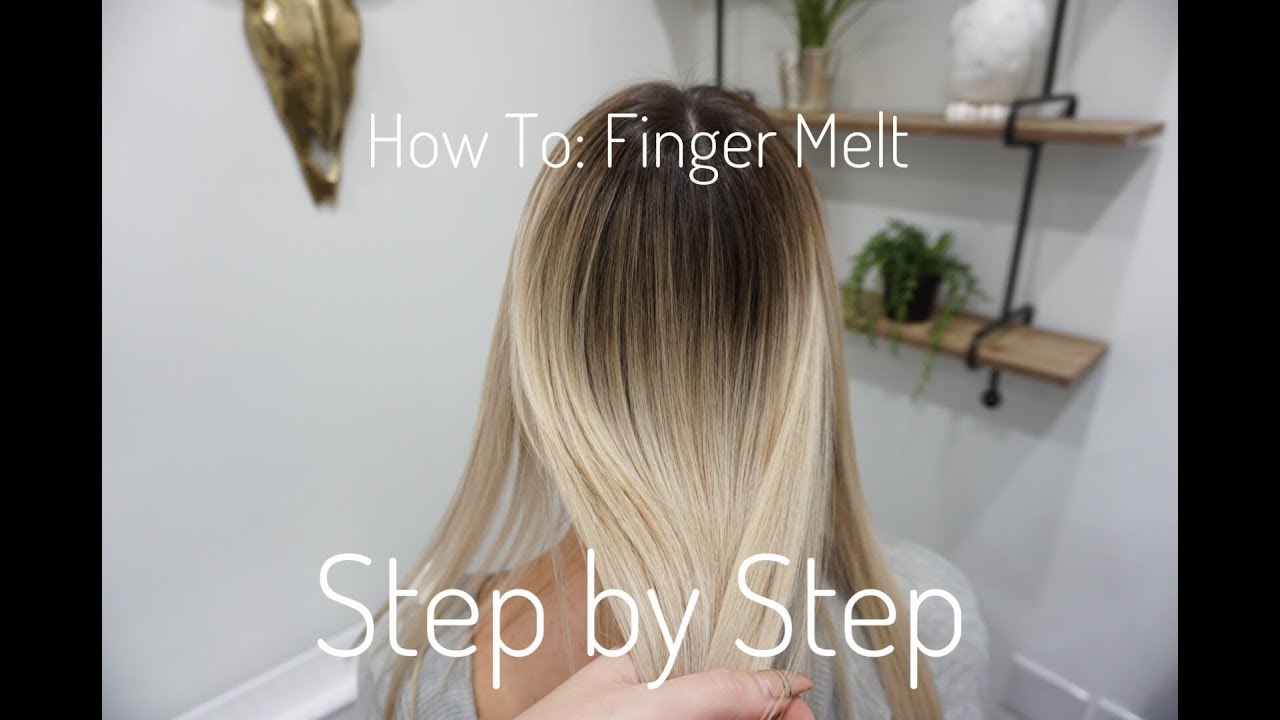
- Apply the lighter color first
- Using a brush or your fingers, apply the lighter color from mid-shaft to ends
- Melt the colors together
- Once the lighter color is applied, take your brush or fingers and lightly blend the two colors together at the roots andmid-shaft for a seamless transition
101: Learning the Basics of Color Melt | Kenra Color
How to Do a Color Melt on Blonde Hair
When it comes to hair trends, there’s always something new and exciting to try. But sometimes, the best looks are the ones that take classic techniques and put a modern spin on them. That’s definitely the case with the color melt trend – it’s a technique that can be used on any hair color, but looks especially beautiful on blonde locks.
So if you’re curious about how to do a color melt on blonde hair, read on for all the details!
The key to a successful color melt is using multiple shades of dye that are similar in tone. This creates a seamless blend of colors that “melt” together, hence the name.
When choosing your colors, make sure to avoid anything too drastic – think subtle ombré rather than starkly contrasting highlights.
Once you have your colors selected, it’s time to get started! The first step is to apply the lightest shade from root to mid-shaft.
Then, apply the next darkest shade from mid-shaft to ends. Finally, add in pops of the darkest shade around your face for added dimension. Once all of the dye is applied, use a wide-tooth comb to blend everything together until you achieve your desired look.
And there you have it – everything you need to know about how to do a color melt on blonde hair! This trendy technique is perfect for those who want a little bit of change without going too crazy with their look. So if you’re feeling adventurous, give it a try!

Credit: morethanglam.com
How Do You Melt Hair Color at Home?
Hair color can be a great way to change up your look, but sometimes it can be tricky to get the exact shade you want. If you find yourself with hair color that’s too dark or vibrant, you may be wondering how to melt hair color at home.
Luckily, there are a few simple ways to lighten hair color.
One popular method is using vitamin C tablets. Simply dissolve the tablet in water and apply it to your hair. Leave it on for 15-20 minutes before rinsing out.
You can also try using lemon juice or baking soda as natural bleaching agents.
Another option is to use a store-bought hair lightener kit. These typically come with peroxide and developer, which you’ll mix together and apply to your hair.
Be sure to follow the instructions carefully so you don’t end up with uneven results.
If all else fails, you can always visit a professional stylist and have them fix your hair color mistake!
Can You Dye Melt Hair?
If you’re looking to add a little bit of color to your melt hair, you may be wondering if you can dye it. The answer is yes! You can definitely dye your melt hair, but there are a few things you need to keep in mind before doing so.
For starters, it’s important to use a semi-permanent or temporary hair color when dying melt hair. This is because the chemicals in permanent hair color can be too harsh for melt hair and may cause it to break or become damaged. If you do want to use a permanent hair color, make sure to consult with a professional stylist first.
It’s also important to avoid using bleach on your melt hair. Bleach is extremely damaging to all types of hair, but it can be especially damaging to melt hair. If you must use bleach on your melt hair, make sure to follow the instructions carefully and only use it sparingly.
When dying your melt Hair, always start with a strand test first. This will help you determine how the color will react with your particular type of melt Hair before committing to coloring all of it. To do a strand test, simply apply some of the dye mixture onto a small section of clean, dry Hair and wait for the allotted time specified by the manufacturer.
Once the time is up, rinse out the dye and check out your results!
Keep these tips in mind and you’ll be able to successfully dye your melt Hair without any problems!
How Do You Color Melt Roots at Home?
When it comes to hair color, there are a lot of trends that come and go. But one trend that has definitely stuck around is the color melt. This technique involves using two or more colors on your hair to create a melted, natural-looking effect.
And while it may look like a complicated process, it’s actually quite simple to do at home!
Here’s everything you need to know about coloring your roots to get the perfect color melt:
1. Choose Your Colors
The first step is to choose the colors you want to use for your color melt. If you’re not sure what colors will work together, ask your stylist for help choosing the right shades. Once you have your colors chosen, mix them together in equal parts.
2. Apply Color To Roots
Now it’s time to apply the color to your roots! Start by sectioning off your hair so that only the roots are exposed.
Then, using a brush or applicator bottle, apply the color evenly throughout your roots. Make sure all of the hair is covered with color before moving on to the next step.
3. Melt The Colors Together
Once all of your roots are colored, it’s time to start melting the colors together. Take a small section of hair and use a curling iron or flat iron to lightly press down on the strands while moving it back and forth (this will help blend the colors together). Repeat this process until all of your hair has been melted together.
What is Color Melt in Hair Coloring?
Color melt is a hair coloring technique that involves blending two or more colors together to create a seamless, gradient effect. The end result is a multi-dimensional look that has become increasingly popular in recent years.
The key to creating a successful color melt is to choose colors that compliment each other and blend well together.
For example, you might choose to pair a dark brown with a lighter brown or blonde, or even mix multiple shades of the same color family. Once you’ve selected your colors, your stylist will apply them directly to your hair, starting with the lightest shade at the roots and gradually transitioning to the darkest hue at the ends.
Another important factor to keep in mind when achieveing a color melt is maintaining healthy locks – since this technique does require bleaching and/or lightening of the hair, it’s essential that you use high-quality products and follow up with regular deep conditioning treatments.
With proper care, your color melt will last for several months before needing touch-ups.
Conclusion
Looking to add a little dimension to your hair color? Color melting is a technique that can create a multidimensional look by seamlessly blending two or more colors together. And the best part?
It can be done right at home! Here’s how to color melt hair:
Start with clean, dry hair.
If your hair is already colored, make sure it’s been at least two weeks since your last treatment.
Divide your hair into four sections and clip them up out of the way. Starting in the back, take small subsections of hair and apply the lighter color first, followed by the darker color.
Continue this pattern until all of your hair has been colored.
Once you’re finished applying color, use a wide-tooth comb to blend the colors together for a natural-looking finish. Allow the color to process according to the instructions on the box before shampooing and conditioning as usual.