How to Crop Photo on Mac
If you have ever needed to crop a photo on your Mac, you may have found the process to be a bit confusing. While it is true that there are a number of ways to crop photos on Mac, using the built-in Preview app is usually the quickest and easiest way to do it. In this article, we will show you how to crop a photo on Mac using Preview.
- To crop a photo on Mac, first open the image in Preview
- Next, click on the “Edit” button in the top toolbar, and then select “Crop” from the drop-down menu
- A box will appear around the edges of the image
- To crop the image, simply click and drag one of the corners or sides of this box inward until it is positioned where you want it
- Finally, click on the “Crop” button in the top toolbar to apply your changes
3 Ways To Crop Photos On a Mac
How to Crop Photo on Mac Preview
If you need to crop a photo on your Mac, Preview is the built-in app that you can use to do so. Here’s how:
Open the photo you want to crop in Preview.
Click on the Tool icon in the toolbar and select Crop from the dropdown menu.
Drag the cursor around the portion of the photo you want to keep. To constrain your selection to a specific aspect ratio, hold down the Shift key while dragging.
Once you’re happy with your selection, click on the Crop button in the toolbar.
And that’s all there is to it! Cropping photos in Preview is quick and easy.
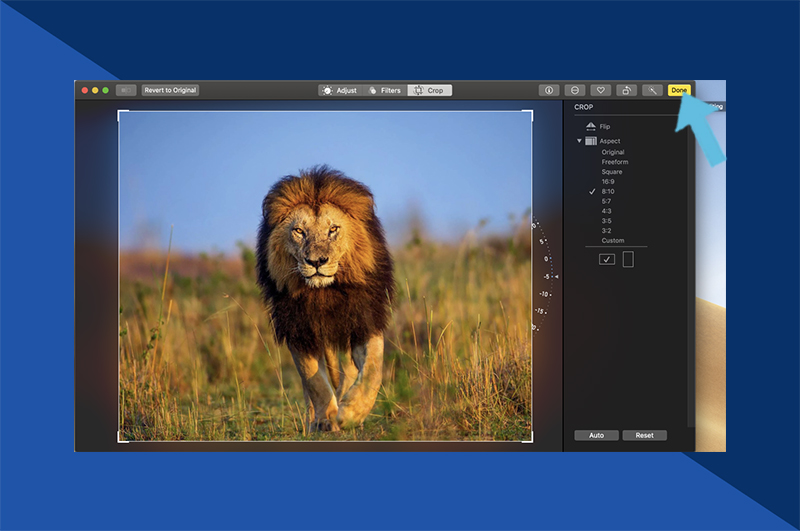
Credit: www.blog.motifphotos.com
Where is the Crop Button on Mac?
If you’re looking for the Crop button on a Mac, you won’t find it in the same place as it is on a Windows computer. On a Mac, the Crop button is located in the top left corner of the screen. To crop an image on a Mac, first open the image in Preview.
Then, click on the Tools menu and select Adjust Size. In the window that opens, you’ll see a field for Width and Height. Enter the new dimensions for your cropped image and click OK.
What is the Shortcut to Crop on a Mac?
There is no one-click shortcut to crop an image on a Mac. However, there are a few ways you can quickly and easily crop your images using the built-in tools in macOS.
The first way is to use the Preview app that comes with every Mac.
Simply open your image in Preview, click on the “Tools” menu, and then select “Crop.” This will bring up a cropping tool that you can use to select the area of the image you want to keep. Once you’ve made your selection, just click “Crop” and the image will be cropped accordingly.
If you’re looking for more control over your crops, or if you need to crop multiple images at once, you can use the Photos app. Just open up Photos, select the images you want to crop, and then click on the “Edit” button in the top right corner. From here, you’ll see a toolbar with various editing options; under the “Transform” heading, click on “Crop.”
This will bring up a cropping interface that lets you fine-tune your selection beforecroppingthe images.
Finally, if you’re a fan of keyboard shortcuts, there’s a quick way to crop images directly in Finder. Just select the image (orimages)you want to crop, press Command+K (which brings up the “Quick Action” menu), and then choose “Crop.”
This will launch Preview’s cropping tool so you can make your selection; when you’re done just hit Enter/Returnto finalize thecropand save it back to its original location.
How Do You Crop And Resize on a Mac?
When you crop and resize an image on your Mac, you can adjust the size of the image to fit a specific space or print page. You can also choose to keep the aspect ratio of the original image, or you can change it to fit your needs.
To crop and resize an image in Preview:
1. Open the image file in Preview.
2. Select the Tools menu, then choose Adjust Size from the drop-down menu.
3. In the Resize dialog box that appears, enter new values for Width and Height.
If you want to maintain the original aspect ratio of the image, make sure that “Constrain Proportions” is selected.
4Click OK when finished.
How Do You Crop a Picture on a Mac Without Photoshop?
There are a number of ways to crop a picture on a Mac without Photoshop. Here are some methods:
1. Use the Preview app that comes installed on every Mac.
Simply open your image in Preview and select the Tools menu. Then, click on the Crop tool and select the area you want to keep. Finally, click on the File menu and choose Export… to save your cropped image.
2. If you have iPhoto installed on your Mac, you can use it to crop pictures as well. Open your image in iPhoto and click on the Edit button in the upper right corner. Then, select the Crop tool from the toolbar and crop your image as desired.
When you’re done, click on the Done button and then export your cropped image from iPhoto.
3. There are also a number of free online photo editors that you can use to crop pictures without Photoshop, such as PicMonkey or Pixlr .
Conclusion
If you want to crop a photo on your Mac, there are a few different ways you can do it. One way is to open the photo in Preview and use the built-in cropping tool. Another way is to use the Photos app, which also has a cropping tool.
Finally, you can use an online service like PicMonkey or Canva.