How Do I Find My Printer on Mac
When you connect a printer to your Mac, the built-in OS X driver for that particular printer is automatically installed. This driver provides basic printing capabilities for your Mac. However, if you want to take full advantage of all the features that your printer offers, you need to install its specific driver.
If you’re using a Mac, there’s a good chance you’ll be able to find your printer without too much trouble. Here are a few tips to help you locate your printer on Mac:
1. Check the System Preferences.
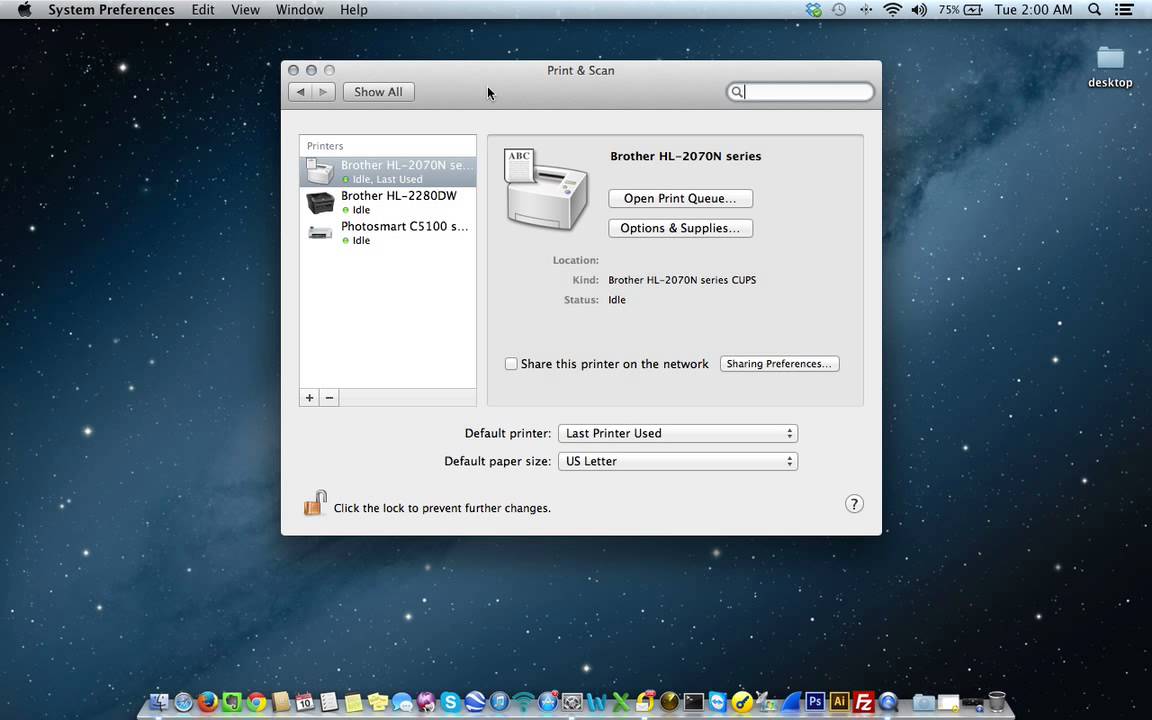
This is usually the first place to look when trying to find a specific setting on your Mac. To access System Preferences, click on the Apple menu in the top left corner of your screen and select “System Preferences.” Once you’re in System Preferences, look for an icon that says “Printers & Scanners” or simply “Printers.”
Clicking on this will open up a list of all the printers currently installed on your Mac.
2. If you still can’t find your printer in System Preferences, try looking in the Applications folder. Open up Finder and click on “Applications” in the sidebar.
Then, use the search bar at the top of the window to search for “printer.” This should bring up any applications related to printing, including any drivers or utilities for your specific printer model.
3. If you’re still having trouble finding your printer, try contacting the manufacturer directly.
They may have specific instructions or troubleshooting steps for getting their printers to work with macOS.
Hopefully one of these tips helps you locate your printer on Mac!
How to Install a Printer on Mac (detailed) 3 Ways to Connect Wireless, Ethernet, and USB
How Do I Get My Mac to Recognize My Printer
If you’re having trouble getting your Mac to recognize your printer, there are a few things you can try. First, make sure that the printer is properly connected to the computer and turned on. Then, check to see if the printer is appearing in the list of devices in the System Preferences.
If it’s not, you may need to install the appropriate drivers for your printer.
Once you’ve ensured that the printer is properly connected and turned on, try restarting your computer. This will often clear up any issues with recognition.
If restarting doesn’t work, try unplugging the USB cable from both the printer and the computer, then plugging it back in. Make sure that you plugged it into a USB port on your computer – some printers require specific ports in order to work properly.
If you’re still having trouble, there are a few other things you can try.
One is to resetting the printing system on your Mac. You can do this by going into the Printers & Scanners preference pane and clicking on the “Reset Printing System” button at the bottom of said pane. This will remove all printers from your system and allow you to start fresh with adding them back in again.
Credit: www.hp.com
Why is My Printer Not Showing Up on My Mac?
If your printer isn’t appearing in the list of devices on your Mac, there are a few potential causes. First, make sure that the printer is turned on and connected to the same Wi-Fi network as your Mac. If it’s still not showing up, try restarting both your Mac and the printer.
If those basic troubleshooting steps don’t work, it’s possible that your printer isn’t compatible with AirPrint, the technology that allows iOS devices to print wirelessly. To check if your printer is compatible, consult its documentation or visit Apple’s support site.
How Do I Make My Printer Show Up on a Mac?
Assuming you would like a step by step guide on how to make your printer show up on a Mac:
1. Check if your printer is plugged in and turned on. If it is not, plug it in and turn it on.
2. On your Mac, open System Preferences and click Printers & Scanners. If you don’t see Printers & Scanners preferences, click Print & Fax, then click the Open Print & Fax Preferences button at the bottom of the window.
3. Click the Add button , then select your printer from the list of available printers.
If you still can’t add your printer after following these steps, contact the manufacturer of your printer for help adding it to your Mac.
How Do I Add a Wireless Printer to My Mac?
Assuming you would like a step-by-step guide on how to add a wireless printer to your Mac:
1. Check if your printer is compatible with AirPrint. AirPrint is a built-in printing solution for Apple devices.
If your printer is compatible, adding it should be as simple as connecting it to the same Wi-Fi network as your Mac and selecting it from the list of available printers in the Print dialog. For more information on AirPrint and a list of compatible printers, check out Apple’s support page here: https://support.apple.com/en-us/HT201387
2. If your printer is not compatible with AirPrint, you’ll need to download and install any necessary drivers from the manufacturer’s website before proceeding.
Once you have done that, open System Preferences from the menu in the top left corner of your screen. Then click on Printers & Scanners and select + at the bottom of the window to add a new printer.
3. Next, you’ll be presented with a few different options for adding a printer.
Select IP at the top of this list and enter the IP address or hostname of your printer into the corresponding field below; then click Add when you’re finished. Your wireless printer should now appear in the list of available printers!
How Do I Get My Mac to Recognize My Hp Wireless Printer?
You may be able to get your Mac to recognize your HP wireless printer by connecting the printer to your computer using a USB cable and then restarting your computer. If that doesn’t work, you can try resetting the printing system on your Mac. To do that, go to System Preferences > Printers & Scanners and click the “Reset Printing System” button.
After resetting the printing system, try adding your printer again.
Conclusion
If you’re using a Mac and need to find your printer, there are a few different ways you can do it. One way is to open the “System Preferences” app and look for the “Printers & Scanners” icon. You can also use the “Spotlight Search” feature by pressing Command+Spacebar and typing in “Printers.”
If you know the name of your printer, you can also try searching for it in the Finder. Once you’ve found your printer, you can add it to your list of favorite devices so that it’s always easy to find.